Final IA Stages 2018
For a general overview of the requirements from IBO for the final submission, refer to the Guidance for the development of the internal assessment page of the Computer Science Teacher Support area of the IBO CS portal.
As we go through these steps together in class, you should keep a running list in TextEdit or on your phone or some place of the things you need to continue to work on on your own.
(btw is it index.html, or 00399-1234Index.html?)
- Completion & Titles
- Word Count
- Final Drafts
- Interview Appendices
- Code Listings
- The Product (JAR file) (A video of Netbeans project upload) (& a video of JAR production and upload)
- Record of Tasks
- Possibly add Code Buddy E-mails as Appendix (if had code buddies)
- Submission Folder Structure
- HTML Cover Page
- Submission Procedures
1. Completion & Titles
Check Google doc for completion of all parts & make sure titles for each one.
- Make sure you have each of these sections in your Google doc.
- And make sure each section is titled, and that the titles stand out in some way, consistently through the document. The titles don't have to be exactly as below, but they can be:
A - Planning
Problem Statement
Description of Scenario
Rational for Proposed Product
Success Criteria
Prototype
B - Design (Solution Overview)
Record of Tasks
Chronological Development Plan
Class Diagrams
Input and Output table
Testing
C - Development
Short Introduction
Summary List of All Techniques
Structure of the Program
Data Structures Used
Main Unique Algorithms
User Interface/GUI Work
Software Tools Used
E - Evaluation
Evaluation of the Product
Recommendations for Future Development
Interviews
First interview with the client
Second, "clarifying" interview
Evaluation interview
2. Word Count
Final Word count & word counts showing
Here are some notes on word count, directly from the IBO:
"Word Limit
Students and teachers must insure that the word limit is not exceeded. If a student does exceed the word limit of 2000 words, the moderators are instructed not to read beyond this point. This means students could potentially lose marks from the last sections of the solution, such as criteria C and E (potentially worth 18 marks). Regulations regarding the use of annotations and tables should be closely followed.
During the writing of the documentation student should bear in mind the suggested word length for each section provided in this publication. Stephen should include the total number of words on the cover sheet.
Is the penalty imposed when a student does not follow the recommendations on the length of the solution?
Yes. The maximum word limit for the documentation for the solution is 2000 words. Once a student reaches this word limit no further work will be marked.
If forms, tables, bullet points or footnotes are used for extended text (for example, for explanation, analysis and evaluation) thereby trying to exclude from the word count, this text will be included in the word count."
And here is the relevant section of the "Guidance for the development of the internal assessment" part of the Internal Assessment Teacher Resource Material on-line document.
Word count and format
These word count figures in the table below are guidelines.
The overall word limit for the solution is 2,000; however, it is possible to complete the solution in 1,500 words without a significant loss of quality.
If students write extended prose in the sections where the word count does not apply, these words will be counted in the overall word count.
It is strongly recommended that the documentation is submitted in a commonly used format such as a PDF.
Prescribed format(s) of presentation are indicated in bold.
Criterion |
Recommended word count |
Comments—format of presentation |
|---|---|---|
Planning |
||
Defining the problem or unanswered question |
175–250 |
Extended writing |
Justification for the proposed product |
175–250 |
Extended writing |
Success criteria |
n/a |
Bulleted list |
Solution overview |
||
Record of tasks |
n/a |
Record of tasks form: May be presented in the form of a table. (Note: Use of template required.) |
Design overview |
n/a |
Diagrams: Including scanned sketches, lists or concise statements, table for assets and techniques and for test plan. |
Development |
||
Developing the product |
500–1,000 |
Extended writing: Justification of techniques used, including annotated screenshots and sources where appropriate. |
Functionality and extensibility of product |
||
Evidence of functionality |
n/a |
Video of product functioning plus, if necessary or appropriate, document including screenshots showing the product functioning should be included in the documentation folder with information on how to access it on the cover page. |
Extensibility |
n/a |
Assessed through design overview and, where appropriate, code listing. |
Evaluation |
||
Evaluation of the product |
175–250 |
Extended writing |
Recommendations for further development |
175–250 |
Extended writing |
TOTAL |
1,200–2,000 |
|
Appendix/appendices |
n/a |
Additional information, such as evidence of consultation with and feedback from the client and/or adviser. |
Make sure to put a word count for each Extended writing section mentioned above, along with an overall word count at the top of your document.
Word Count Precautions and Word Reductions
Precautions
If you are close to the 2000 word limit, you should add the following precautions within your text to make sure the moderator does not count words he/she should not.
- To pseudocode sections add a note something like: "(This is pseudocode, and therefore does not count toward the word count.)"
- Be careful that you are counting tables and bulleted lists if being used in one of the "Extended writing" sections above.
- Think about converting a section or two which is presently narrative into a table or bulleted list - since these take up less words.
Word Reductions
Before you start looking to reduce your word count, note the following:
The one thing you may have included in the word count but you shouldn't is the Success Criteria as long as it's a bulleted list.
And note that in Criteria B, nothing at all counts toward the word count.
So if after noting these two things, you're still close to or above 2000 words, you'll have to reduce the word count somehow. But the good news is the more you read through what you have written, the more you will realize that you can say what you mean in less words. So take what may very well have come out of your mind like a stream of consciousness at the time of writing, and condense it; it's actually easier than you might think.
3. Final Drafts
Final drafts of all sections, based on teacher feedback
Keep in mind here an ISB grade is not necessarily directly translatable to a Criterion grade (out of 12, or 5, for example), so you should go back to the IB rubric descriptions right from the IB documentation itself.
4. Interview Appendicies
Put here your full text versions of your interviews, or if they were audio, a link to the audio file(s), and the audio file(s) in the root folder of the HTML organization. Recall that you put a picture only of your interviews in Criterion A.
5. Code Listings
Code listing Appendices - export from Netbeans etc. & fixed up in TextEdit etc. (I may do this part.)
- We will use html pages for the classes in the Appendix, which will be "printed to html" from Netbeans, so there's no need to convert them to pdfs.
- If it's no done by default, change the text color of the NetBeans etc. auto-generated code to be block grey or something else we agree upon.
And make a clear note of this fact near the beginning of the code, something like this (just copy and paste it if you wish):
/*
####################################################################
####################################################################
####################################################################
####################################################################
####################################################################
*************** NOTE THAT ALL THE CODE WHICH IS ********************
*************** HIGHLIGHTED GREY BLOCK IS AUTO- ********************
*************** GENERATED FROM NETBEANS, NOT BY ********************
*************** ME. (It's mainly the GUI stuff.)********************
####################################################################
####################################################################
####################################################################
####################################################################
####################################################################
*/
- AND DEFINITELY CUT AND PAST ALL OF THE AUTO GENERATED CODE DOWN AT THE BOTTOM OF THE MAIN GUI FILE, so that it is easier to see your own code.
- Optionally, you could reduce the size of the Netbeans auto generated code, so it’s obviously smaller, but still able to be discerned, if not terribly easily read.
- And you should also delete all the Netbeans auto-comments (for example “Put code here.”)
- Make your comments the darkest shade of grey.
6. The Product & JAR file
From Netbeans etc. you should pass on two things to show your product:
A. The Netbeans etc. project - All you have to do for this is go File, Export Project to Zip, and then make sure you pick the correct Project Root. The problem with this stage is getting all of your external JAR files and external libraries properly added, so that they are within the structure of your Netbeans etc. project folder. If you have a hard time with this, at least make sure you have passed to me your application JAR file (see next section).
But here are the links to putting external JAR and library files in the right place:
- Importing others' libraries/JARs etc. - Folder example
- Importing others' libraries/JARs etc. - JAR example
Plus a very short video of uploading to Haiku your Netbeans project:
Video: Uploading Netbeans project to Haiku
B. The compressed "JAR" Java file - Which is effectively the application, and can be run on any computer with a Java Virtual Machine installed. You should change the name of this JAR file to be the name of your application.
Here's the video to use in conjunction with the "XML" script below you'll have to paste into the .pom file.
- To make an executable JAR file from a Netbeans Maven project
- Find the “pom.xml” file in the “Project Files” folder of your Netbeans project.
- Paste in the following, right before the final project tag: </project>
<build>
    <plugins>
    <plugin>
    <artifactId>maven-assembly-plugin</artifactId>
    <version>2.4</version>
    <configuration>
    <descriptorRefs>
    <descriptorRef>jar-with-dependencies</descriptorRef>
    </descriptorRefs>
    <archive>
    <manifest>

    <mainClass>com.mycompany.myIAProject.MyMainGUI</mainClass>

    </manifest>
    </archive>
    </configuration>
    <executions>
    <execution>
    <id>make-assembly</id>
    <phase>package</phase>
    <goals>
    <goal>single</goal>
    </goals>
    </execution>
    </executions>
    </plugin>
    </plugins>
</build>
- And, in the pom.xml script above, change the main class to be the name of your main GUI class (what’s in bold).
- Then Control-click on the project icon in Netbeans (the coffee cup icon for your project), and go Clean and Build.
- You will find the executable jar file in the “target” folder of your Netbeans project (probably in your home folder, and a folder called Netbeans Projects).
- The name will be something like:
- myIAProject-1.0-SNAPSHOT-jar-with-dependencies.jar
- But you can change the name to whatever you want, just keep the .jar extension.
- This file can be sent to anyone who has Java installed on their computer (most people), and they just double-click it to run it, like any other application file (.exe, or .app, etc.)
7. Record of Tasks
Complete and tidy up Record of Tasks
Hopefully you have kept up with your record of tasks.
If not, check at the top of this page for the sections of the IA, and make sure at least each of them is there, with approximate, if not pin-point accurate dates and times. Another place you could look both for completed stages and dates is the Haiku homework submission page.
The record of tasks was supposed to have been done using the .rtf template. If you did not use it from the beginning, either transfer things now, or make sure it looks the same and covers the same information.
Here is the original Record of Tasks document.
8. Possibly Code Buddy E-mails as Appendix
Something to think about. If you do, put a descriptive paragraph ahead of it.
9. Submission Folder Structure
Framework of the Solution folder structure and file naming
The following is from IBO OOC (now called something else), modified for on-line uploading (instead of by CD ROM as it used to be done).
B4.4.2.1 Sending sample IA work for moderation
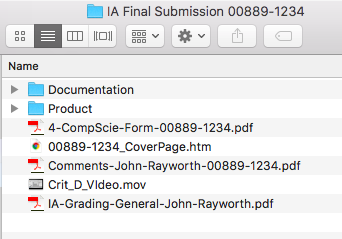
Each candidate is expected to submit their solution in a zip file (template available in the Teacher Resource Materials). The zip file should be labeled with the session number and candidate surname (ISB JSR note - we'll refrain from adding surnames). The top level of each candidate’s zip file at this stage should contain:
• a cover page in HTML format
• a “Product” folder, containing the final product (see Note below)
• a “Documentation” folder, containing the associated documentation
• a video, demonstrating the product functioning (see Note below)
Here are images that will help you understand the necessary folder structures to both match the html template, and assure you have everything you should have:
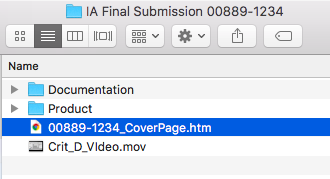
Root folder - Initial
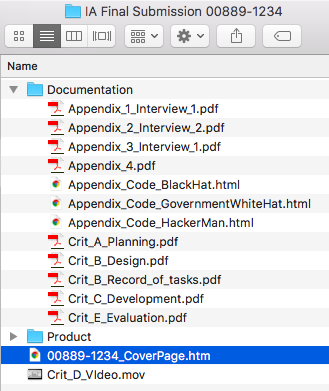
Documentation Folder
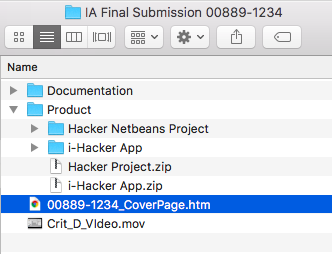
Product Folder Root
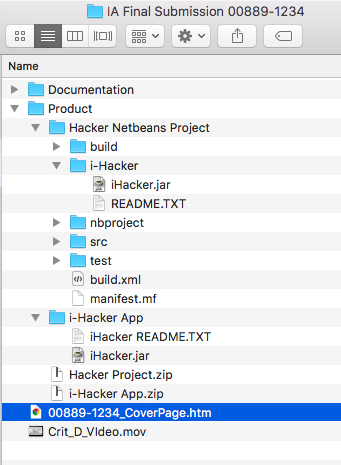
Product Folder Disclosed
Notes on the folder structure:
The product folder should contain a “working” version of the product, in whatever format it is best presented. So for Java programs, it is best to include the product as JAR file, which is the compressed class files that are ready for the Java Virtual Machine to run; so it is for all intents and purposes the application file.
And you should also include the Netbeans project, in case the moderator knows/has Netbeans and wants to did a little deeper into your project. On the other hand, moderators may not have facilities to run all products that is why the video showing that the product functions is required first and foremost.
A Reminder About the Video (from IBO)
Reminder that the video should be 2-7 minutes long that focuses SOLELY on demonstrating that the product functions (no introductions to the candidate, problem discussion etc.). If it is much longer, examiners might not watch it all. And both .mov and .mp4 video formats are fine.
10. HTML Cover Page
Production/Editing of HTML cover page document
So if you have all your ducks lined up, and - importantly - names of files as the IB suggests, this part is actually not all that painful as long as you're not scared off by the html.
Here's the html document to download and open in an html editor. The easiest is to use TextEdit. When opening the file, just do so via File, Open (not a double-click), and before you click the Open button in the open dialogue box, click the Options button, and check the "Ignore rich text commands" check box. Then you can edit the html directly.
And here is a video to show you generally how to work with the html document:
Here is what the cover page will end up generally looking like: